Databricks Deployment Instructions
The following steps enable Tecton to access your data plane account to manage AWS and Spark resources.
These instructions assume you are using Databricks as the Spark provider. If you are using EMR, please see the EMR deployment instructions instead.
Terraform Templates for AWS Account Configuration
If your organization uses Terraform to manage AWS resources, we recommend you leverage this sample terraform setup repository in place of manually entering these values. The instructions below may still be a valuable reference when adapting the template to your needs, especially if your databricks installation is in a separate account from the Tecton control plane. Once you've applied the configuration to your account, please see the request your installation step.
At the end of these steps, you will have created:
- A S3 Bucket where Tecton will write feature data.
- The cross-account role for the Tecton control plane to manage DynamoDB and S3, e.g.
tecton-{DEPLOYMENT_NAME}-cross-account-roleandtecton-{DEPLOYMENT_NAME}-cross-account-policy. - The Spark policy, e.g.
tecton-{DEPLOYMENT_NAME}-spark-policyattached to your existing Databricks Spark role. This policy enables Spark to to write feature data to Dynamo, and read and write feature data to S3.
Before you get started:
- Decide on a name for your deployment (e.g.
mycompany-production), which will eventually turn into the url for your Tecton UI (mycompany-production.tecton.ai). Note: This name must be less than 22 characters. - Determine which AWS region you'd like Tecton deployed into (e.g.
us-west-2).
Create a Tecton S3 Bucket
Tecton will use a single S3 bucket to store all of your offline materialized feature data.
To set this up, create an S3 bucket called tecton-[DEPLOYMENT_NAME] (e.g. tecton-mycompany-production).
- Ensure the bucket's region is the same as the region in which you'd like to deploy Tecton (e.g.
us-west-2) - Enable default encryption using the Amazon S3 key (SSE-S3)
Create a cross-account role for the Tecton Control Plane
Next, you'll need to create an access policy and an IAM role which the Tecton control plane will use to orchestrate AWS resources in your account.
- In the AWS Console of the account you want to deploy Tecton into, go to the IAM service.
- Click the Policies tab in the sidebar.
-
Click Create Policy.
-
Paste in the following JSON policy, replacing
${REGION}with the AWS region you selected for your deployment,${ACCOUNT}with the account ID of your AWS account,${DEPLOYMENT_NAME}with your Tecton deployment name, and if using Databricks in the same AWS account,${SPARK_ROLE}with instance profile role used by Databricks. If your${SPARK_ROLE}is prefixed with "tecton-" or in a different account, you can omit that line.{ "Version": "2012-10-17", "Statement": [ { "Sid": "DynamoDB", "Effect": "Allow", "Action": [ "dynamodb:BatchGetItem", "dynamodb:BatchWriteItem", "dynamodb:ConditionCheckItem", "dynamodb:CreateTable", "dynamodb:DeleteItem", "dynamodb:DeleteTable", "dynamodb:DescribeTable", "dynamodb:GetItem", "dynamodb:PutItem", "dynamodb:Query", "dynamodb:TagResource", "dynamodb:UpdateTable" ], "Resource": [ "arn:aws:dynamodb:${REGION}:${ACCOUNT_ID}:table/tecton-${DEPLOYMENT_NAME}*" ] }, { "Sid": "DynamoDBGlobal", "Effect": "Allow", "Action": [ "dynamodb:ListTables", "dynamodb:DescribeLimits" ], "Resource": "*" }, { "Sid": "S3Bucket", "Effect": "Allow", "Action": "s3:ListBucket", "Resource": [ "arn:aws:s3:::tecton-${DEPLOYMENT_NAME}" ] }, { "Sid": "S3Object", "Effect": "Allow", "Action": [ "s3:GetObject", "s3:DeleteObject", "s3:PutObject" ], "Resource": [ "arn:aws:s3:::tecton-${DEPLOYMENT_NAME}/*" ] }, { "Sid": "VerifyPermissions", "Effect": "Allow", "Action": [ "iam:GetPolicy", "iam:GetRole", "iam:GetRolePolicy", "iam:GetPolicyVersion", "iam:ListPolicyVersions", "iam:ListAttachedRolePolicies", "iam:ListInstanceProfilesForRole" ], "Resource": [ "arn:aws:iam::${ACCOUNT_ID}:role/${SPARK_ROLE}", "arn:aws:iam::${ACCOUNT_ID}:policy/tecton-*", "arn:aws:iam::${ACCOUNT_ID}:role/tecton-*" ] } ] } -
Click Next: Tags
-
Add the following tag to the policy
key: tecton-accessible:DEPLOYMENT_NAME value: true -
Click Next: Review
-
Give the policy an easy to remember name starting with
tecton-, liketecton-{DEPLOYMENT_NAME}-cross-account-policy -
Click Create Policy
-
-
Click the Roles tab in the sidebar.
-
Click Create role.
- Under Select type of trusted entity, click the Another AWS account tile.
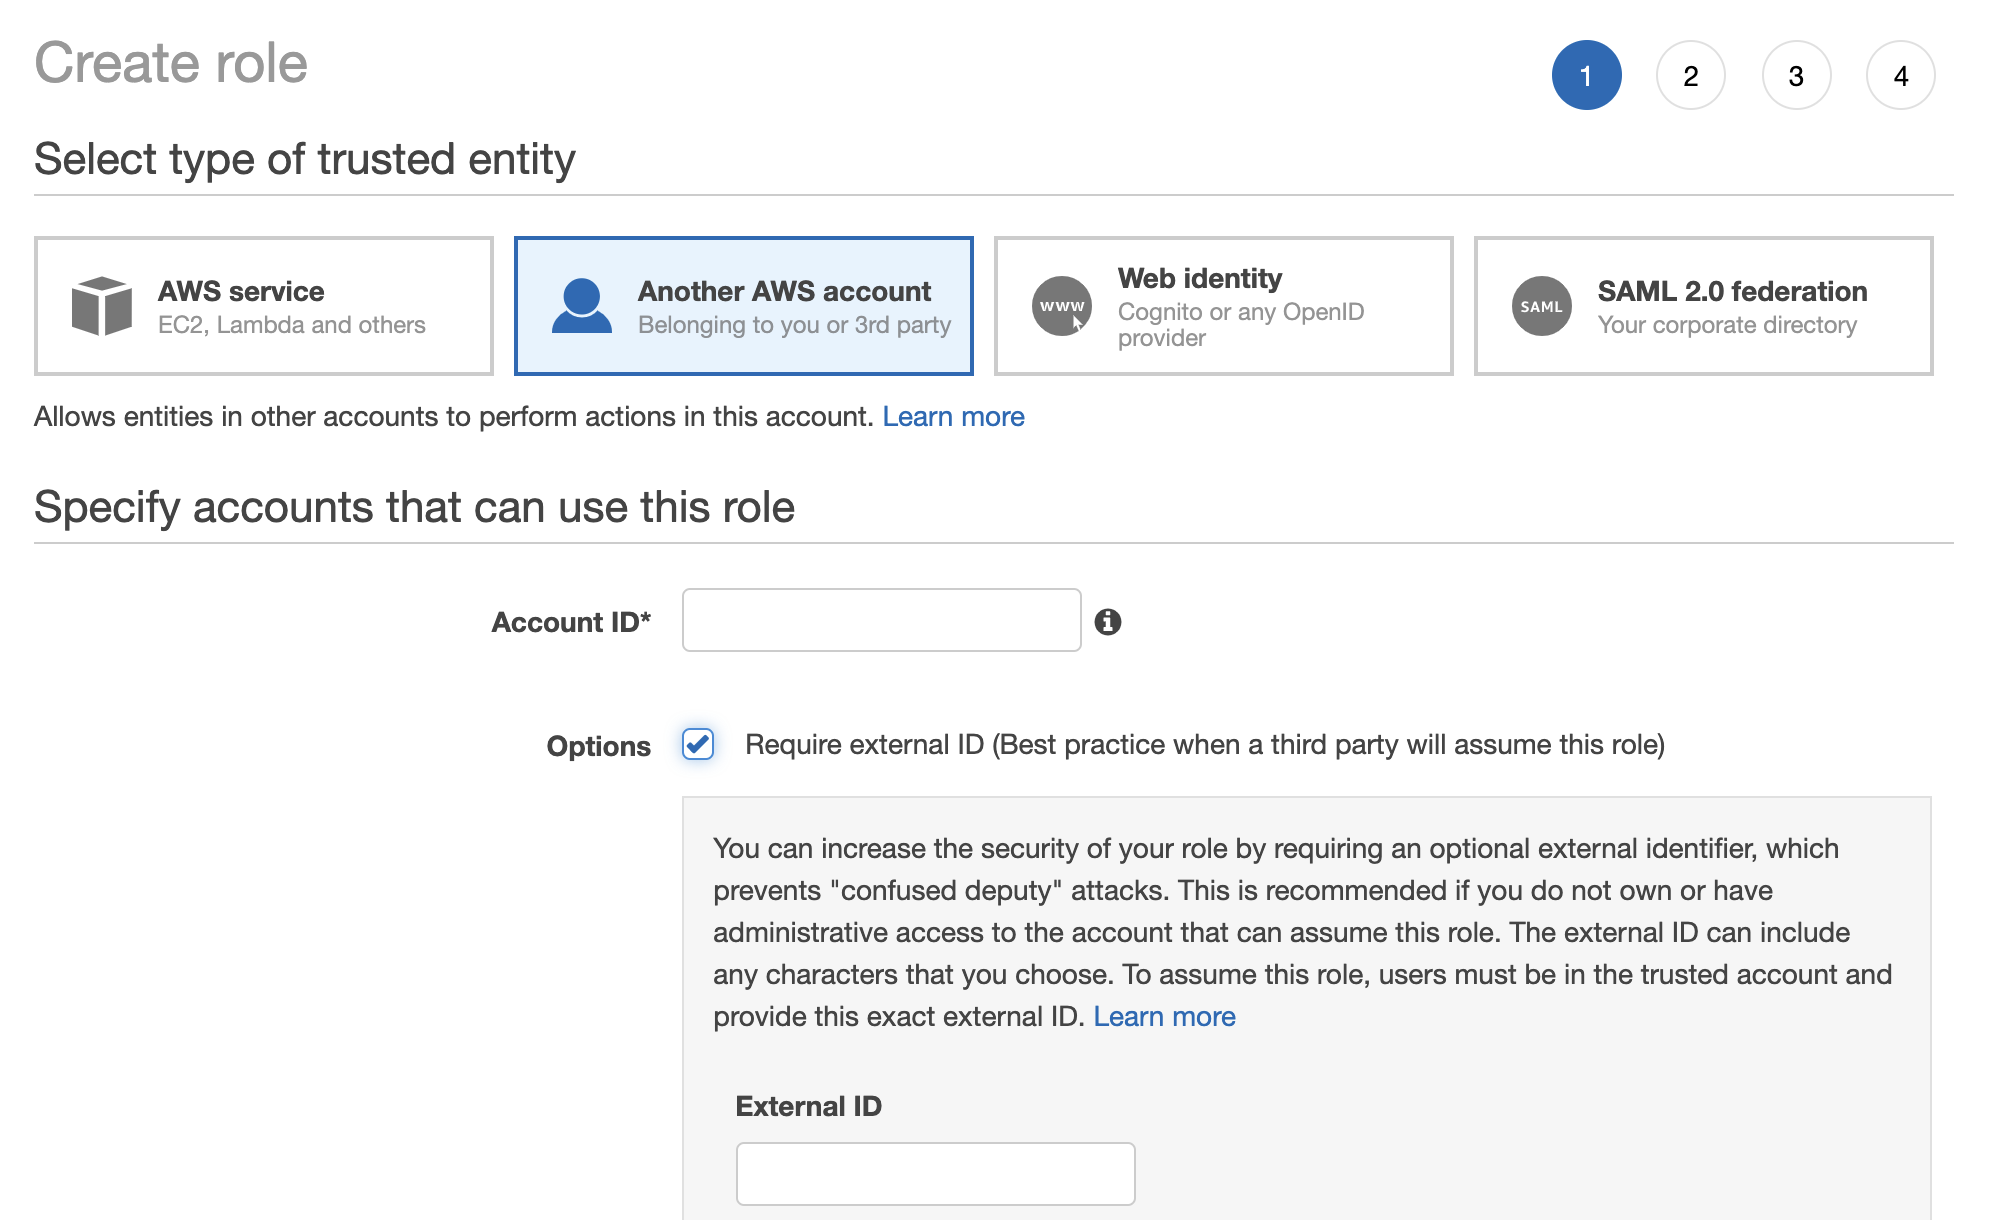
-
Specify Tecton's Account ID. Please contact your Account Manager to get the appropriate ID.
-
Enable the option "Require external ID."
-
Enter a random External ID of your choice (for example, a UUID works well). Make sure to note down the external ID that you choose -- you'll need to provide this to Tecton to complete the installation.
-
Click the Next: Permissions button
-
Search for the policy you just created (e.g.
tecton-{DEPLOYMENT_NAME}-cross-account-policy), and click the check box next to that policy to attach the policy to the new role. -
Click the Next: Tags button.
-
Click the Next: Review button.
-
In the Role name field, enter a role name starting with
tecton-, such astecton-{DEPLOYMENT_NAME}-cross-account-role. -
Click Create role. You will see a list of roles displayed.
Create an AWS Policy for Spark
Databricks will need permission to access the S3 and Dynamo resources created by Tecton. To enable this, you'll need to create a policy, and attach that policy to the Spark role Databricks uses for the Spark agents.
- In the AWS Console of the account that will be running Spark (this could be different from the Tecton deployment account if you have Databricks deployed in another account), go to the IAM service.
- Click the Policies tab in the sidebar.
-
Click Create Policy.
-
Paste in the following JSON policy, replacing
${REGION}with the AWS region you selected for your deployment,${ACCOUNT}with the account ID of your Tecton AWS account, and${DEPLOYMENT_NAME}with your Tecton deployment name{ "Version": "2012-10-17", "Statement": [ { "Sid": "DynamoDB", "Effect": "Allow", "Action": [ "dynamodb:BatchWriteItem", "dynamodb:ConditionCheckItem", "dynamodb:DescribeTable", "dynamodb:PutItem", "dynamodb:Query" ], "Resource": [ "arn:aws:dynamodb:${REGION}:${ACCOUNT_ID}:table/tecton-${DEPLOYMENT_NAME}*" ] }, { "Sid": "DynamoDBGlobal", "Effect": "Allow", "Action": [ "dynamodb:ListTables" ], "Resource": "*" }, { "Sid": "S3Bucket", "Effect": "Allow", "Action": "s3:ListBucket", "Resource": [ "arn:aws:s3:::tecton-${DEPLOYMENT_NAME}", "arn:aws:s3:::tecton.ai.databricks-init-scripts", "arn:aws:s3:::tecton.ai.public*", "arn:aws:s3:::tecton-materialization-release" ] }, { "Sid": "S3Object", "Effect": "Allow", "Action": [ "s3:GetObject", "s3:PutObject", "s3:DeleteObject" ], "Resource": [ "arn:aws:s3:::tecton-${DEPLOYMENT_NAME}/*" ] }, { "Sid": "TectonPublicS3", "Effect": "Allow", "Action": [ "s3:GetObject" ], "Resource": [ "arn:aws:s3:::tecton.ai.databricks-init-scripts/*", "arn:aws:s3:::tecton.ai.public*", "arn:aws:s3:::tecton-materialization-release/*" ] } ] } -
Click Next: Tags
-
Add the following tag to the policy
key: tecton-accessible:DEPLOYMENT_NAME value: true -
Click Next: Review
-
Give the policy an easy to remember name starting with
tecton-, liketecton-{DEPLOYMENT_NAME}-spark-policy -
Click Create Policy
-
Attach this policy to the instance profile role used by Databricks.
-
If your Databricks deployment is in a different account to your Tecton deployment you will need to complete this section to create a cross-account role for Databricks to read and write features. Otherwise, you can skip to the next step.
Cross-Account Databricks Configuration
- In the AWS Console of the account you want to deploy Tecton into, go to the IAM service.
- Click the Policies tab in the sidebar.
-
Click Create Policy.
-
Paste in the following JSON policy, replacing
${REGION}with the AWS region you selected for your deployment,${ACCOUNT}with the account ID of your AWS account, and${DEPLOYMENT_NAME}with your Tecton deployment name{ "Version": "2012-10-17", "Statement": [ { "Sid": "DynamoDB", "Effect": "Allow", "Action": [ "dynamodb:ConditionCheckItem", "dynamodb:DescribeTable", "dynamodb:PutItem" ], "Resource": [ "arn:aws:dynamodb:{REGION}:{ACCOUNT}:table/tecton-{DEPLOYMENT_NAME}*" ] }, { "Sid": "DynamoDBGlobal", "Effect": "Allow", "Action": [ "dynamodb:ListTables", ], "Resource": "*" } ] } -
Click Next: Tags
-
Click Next: Review
-
Give the policy an easy to remember name starting with
tecton-, liketecton-{DEPLOYMENT_NAME}-databricks-cross-account-policy -
Click Create Policy
-
-
Click the Roles tab in the sidebar.
-
Click Create role.
- Under Select type of trusted entity, click the Another AWS account tile.
-
Specify the account id where Databricks is deployed.
-
Enable the option "Require external ID."
-
Enter a random External ID of your choice (for example, a UUID works well). Make sure to note down the external ID that you choose -- you'll need to provide this to Tecton to complete the installation.
-
Click the Next: Permissions button
-
Search for the policy you just created (e.g.
tecton-{DEPLOYMENT_NAME}-cross-account-policy), and click the check box next to that policy to attach the policy to the new role. -
Click the Next: Tags button.
-
Click the Next: Review button.
-
In the Role name field, enter a role name starting with
tecton-, such astecton-{DEPLOYMENT_NAME}-databricks-cross-account-role. -
Click Create role. You will see a list of roles displayed.
-
Go back to the role's Trust relationships tab, edit trust relationship, and change the Principal from "arn:aws:iam::{ACCOUNT}:root" to "arn:aws:iam::{ACCOUNT}:role/{SPARK_ROLE}"
-
Add a Policy to the S3 bucket named "tecton-{DEPLOYMENT_NAME}" to allow Databricks to read/write to it.
-
Navigate to S3 -> "tecton-{DEPLOYMENT_NAME}" S3 Bucket -> Permissions. There, add the following policy where
{SPARK_ROLE_ARN}refers to the arn of instance profile role used by Databricks{ "Version": "2012-10-17", "Statement": [ { "Sid": "DatabricksS3", "Effect": "Allow", "Principal": { "AWS": "{SPARK_ROLE_ARN}" }, "Action": [ "s3:GetObject", "s3:PutObject", "s3:DeleteObject" ], "Resource": "arn:aws:s3:::tecton-{DEPLOYMENT_NAME}/*" }, { "Sid": "DatabricksS3List", "Effect": "Allow", "Principal": { "AWS": "{SPARK_ROLE_ARN}" }, "Action": "s3:ListBucket", "Resource": "arn:aws:s3:::tecton-{DEPLOYMENT_NAME}" } ] }
-
Request your Tecton Installation
Once you've completed the above setup, you're ready to request your installation! Send the following information to the Tecton team:
- Your deployment name (e.g.
mycompany-production) - The region in which you'd like Tecton deployed (e.g.
us-west-2) - The ARN and External ID of the role you created for the Tecton control plane
- Create a Databricks API token that has cluster-create privileges in your Databricks instance and include the token
- The ARN of the Spark role and instance profile used by Databricks
- The URL of your Databricks workspace (e.g.
mycompany.cloud.databricks.com) - The pricing tier of your Databricks account (pricing tiers at https://databricks.com/product/aws-pricing)
- [If Databricks in separate account] The ARN of the cross-account role and the external ID used by Databricks
After you send this information to Tecton, the team will deploy Tecton into your account.